Discover unique geology pieces on sale!

My Secret Shine Recipe
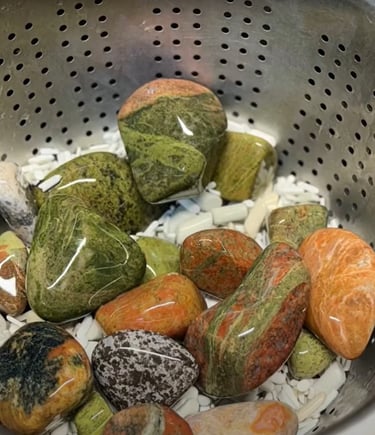
1. What kinds of rocks to use — When we’re out exploring the river or the lakeshore, what should he look for that’s good for tumbling? What properties make a rock polishable?
The biggest recommendation on rocks is to find ones that are shiny already when they are wet. A dull rock when wet is probably going to be a dull rock when polished. Also a big one is to try and find similar ones as tumbling different hardnesses is often a point of frustration for new tumblers. They can turn out dull and not shiny. Also you can use a nail to scratch the surface and only put rocks together that scratch similarly i.e. a piece of granite or quartz wont scratch easily and will polish great together but a piece of sandstone or basalt will scratch easily. The key is to not mix them.
2. What gear you’ll need — Beyond just the tumbler, what grit, media (pellets), or polishing compounds should beginners use?
Grit - This is super important. Most tumblers come with a terrible start kit of grit and will only frustrate you. Toss that immediately. I buy my grit from Kingsley North and I think they sell nice little kits that aren't silly expensive.
https://kingsleynorth.com/?ref=mtu0odv&utm_source=tapfiliate
Ceramic media - I like to mix both small and large sizes. This is also available on Kingsley north.
Borax - this is used to thicken up the slurry so the rocks stay coated in grit
Water
Grit Hound Grit management system (see link below
3. My steps:
High level
- Each stage runs for one week (except stage 1 see below).
- add 1 tablespoon of grit for each pound the barrel holds. For example the Harbor Freight barrel is a 3lb barrel so you will put 3 tablespoons of grit in the barrel
- add 1 tablespoon total of Borax into each barrel
- fill with water to the bottom of the top layer of rocks in the barrel
- add rocks ~3/4 full into the barrel. This doesn't have to be perfect but you don't want it to be too full as you want the rocks to have room to tumble
- add ceramic media in with your rocks so that the entire mixture still is only 3/4 of the barrel. The ceramic essentially fills the gaps between the rocks. This is important or the rocks will crack and "bruise" in the later stages. You will use this in every barrel except stage 1. Stage one is meant to be aggressive and really wear the rocks down and you will eat up the ceramic quickly if you put it in stage 1.
Stage One 60-90 grit- This is the stage that will shape and remove imperfections. Often you may need to run rocks for a few weeks until you are satisfied. After this stage the rocks won't change in shape much, they will just become shinier. Run each barrel for one week at a time and then wash them out and replace the grit, borax, and water, and run for another week. It seems tempting to start after a week on this stage but I guarantee you patience will pay off as you will be much happier after 2 or 3 weeks of polishing. With that said, if after a week they are already nice and round and don't have a bunch of imperfections they are ready for the next stage. Also if one looks like it is ready for the next stage it can come out and the rest can continue. The one that looks good will only get smaller if you leave it in.
Stage Two 180-220 - add ceramic now and you can use that same ceramic through the rest of the stages. Just make sure to wash well between stages. Follow the notes in the "high level"
Stage Three 500 - follow the notes in high level
Stage Four 1000 - follow the notes in high level
Stage Five 22000 - follow the notes in high level. I live to use dedicated ceramic in this stage that is only ever run in stage five. I recommend running a barrel 3/4 full of ceramic media with some rough rocks and some water (no grit) for a few days to break the rough edges off the ceramic and then set this aside for your stage five polish stage.
PS the grits may vary slightly i.e. 1000 may be 1200, 500 may be 400 whatever is closest is fine.
Finally I rinse off the rocks and media and add a tbsp of borax and a few drops of dish soap and tumble for a couple hour